Object detection with Tensorflow - Self Driving Cars in GTA
Hello and welcome to another Python Plays GTA tutorial. In this tutorial, we're going to cover the implementation of the TensorFlow Object Detection API into the realistic simulation environment that is GTAV. Due to the realistic representations that occur inside of GTAV, we can use object detectors that were made for the real-world, and still see success. For example, we can detect cars, people, stop signs, trucks, and stop lights.
Note: Since this last text-based writeup, I have posted quite a few video updates to the self-driving car model, namely covering the changes to the model to handle higher resolution, color, waypoint following, and joystick inputs. If you would like to see these updates, check out the YouTube playlist starting here, or you can check out for text-based writeups on the changes psyber.io.
In this tutorial, we're going to cover implementation of the object detection API. If you want to learn more about the object detection API, or how to track your own custom objects, check out the TensorFlow Object Detection API tutorial. While the pre-made models work fairly well out of the box, your accuracy will go up quite a bit if you train a custom model from game environment data. If you want to learn how to do this, check out the Object Detection tutorial linked above.
There are many ways we could use this object detection in our environment, but I think one of the most obvious is to detect other vehicles and determine whether or not they are too close. How might we do this? Well, to start, we can get by with the object detection API right out of the box to detect cars. As mentioned above, training a specific one from GTA data will give you better results, but I am just going to use the base mobilenet model. Starting from models/object_detection/object_detection_tutorial.ipynb, I am going to export this tutorial code to a python file, calling it vehicle_detector.py.
Now we can remove the plt stuff, the sample image code, and then clean up a bit, giving us:
# coding: utf-8
# # Object Detection Demo
# License: Apache License 2.0 (https://github.com/tensorflow/models/blob/master/LICENSE)
# source: https://github.com/tensorflow/models
import numpy as np
import os
import six.moves.urllib as urllib
import sys
import tarfile
import tensorflow as tf
import zipfile

from collections import defaultdict
from io import StringIO
from matplotlib import pyplot as plt
from PIL import Image

# This is needed to display the images.
get_ipython().magic('matplotlib inline')

# This is needed since the notebook is stored in the object_detection folder.
sys.path.append("..")


# ## Object detection imports
# Here are the imports from the object detection module.

from utils import label_map_util
from utils import visualization_utils as vis_util


# # Model preparation
# What model to download.
MODEL_NAME = 'ssd_mobilenet_v1_coco_11_06_2017'
MODEL_FILE = MODEL_NAME + '.tar.gz'
DOWNLOAD_BASE = 'http://download.tensorflow.org/models/object_detection/'

# Path to frozen detection graph. This is the actual model that is used for the object detection.
PATH_TO_CKPT = MODEL_NAME + '/frozen_inference_graph.pb'

# List of the strings that is used to add correct label for each box.
PATH_TO_LABELS = os.path.join('data', 'mscoco_label_map.pbtxt')

NUM_CLASSES = 90


# ## Download Model
opener = urllib.request.URLopener()
opener.retrieve(DOWNLOAD_BASE + MODEL_FILE, MODEL_FILE)
tar_file = tarfile.open(MODEL_FILE)
for file in tar_file.getmembers():
  file_name = os.path.basename(file.name)
  if 'frozen_inference_graph.pb' in file_name:
    tar_file.extract(file, os.getcwd())


# ## Load a (frozen) Tensorflow model into memory.
detection_graph = tf.Graph()
with detection_graph.as_default():
  od_graph_def = tf.GraphDef()
  with tf.gfile.GFile(PATH_TO_CKPT, 'rb') as fid:
    serialized_graph = fid.read()
    od_graph_def.ParseFromString(serialized_graph)
    tf.import_graph_def(od_graph_def, name='')


# ## Loading label map
# Label maps map indices to category names, so that when our convolution network predicts `5`, we know that this corresponds to `airplane`.  Here we use internal utility functions, but anything that returns a dictionary mapping integers to appropriate string labels would be fine
label_map = label_map_util.load_labelmap(PATH_TO_LABELS)
categories = label_map_util.convert_label_map_to_categories(label_map, max_num_classes=NUM_CLASSES, use_display_name=True)
category_index = label_map_util.create_category_index(categories)


# ## Helper code
def load_image_into_numpy_array(image):
  (im_width, im_height) = image.size
  return np.array(image.getdata()).reshape(
      (im_height, im_width, 3)).astype(np.uint8)


# # Detection
# For the sake of simplicity we will use only 2 images:
# image1.jpg
# image2.jpg
# If you want to test the code with your images, just add path to the images to the TEST_IMAGE_PATHS.
PATH_TO_TEST_IMAGES_DIR = 'test_images'
TEST_IMAGE_PATHS = [ os.path.join(PATH_TO_TEST_IMAGES_DIR, 'image{}.jpg'.format(i)) for i in range(1, 3) ]

# Size, in inches, of the output images.
IMAGE_SIZE = (12, 8)

with detection_graph.as_default():
  with tf.Session(graph=detection_graph) as sess:
    for image_path in TEST_IMAGE_PATHS:
      image = Image.open(image_path)
      # the array based representation of the image will be used later in order to prepare the
      # result image with boxes and labels on it.
      image_np = load_image_into_numpy_array(image)
      # Expand dimensions since the model expects images to have shape: [1, None, None, 3]
      image_np_expanded = np.expand_dims(image_np, axis=0)
      image_tensor = detection_graph.get_tensor_by_name('image_tensor:0')
      # Each box represents a part of the image where a particular object was detected.
      boxes = detection_graph.get_tensor_by_name('detection_boxes:0')
      # Each score represent how level of confidence for each of the objects.
      # Score is shown on the result image, together with the class label.
      scores = detection_graph.get_tensor_by_name('detection_scores:0')
      classes = detection_graph.get_tensor_by_name('detection_classes:0')
      num_detections = detection_graph.get_tensor_by_name('num_detections:0')
      # Actual detection.
      (boxes, scores, classes, num_detections) = sess.run(
          [boxes, scores, classes, num_detections],
          feed_dict={image_tensor: image_np_expanded})
      # Visualization of the results of a detection.
      vis_util.visualize_boxes_and_labels_on_image_array(
          image_np,
          np.squeeze(boxes),
          np.squeeze(classes).astype(np.int32),
          np.squeeze(scores),
          category_index,
          use_normalized_coordinates=True,
          line_thickness=8)
Okay, now let's merge this code with our GTA code, namely, for now, the grabscreen.py file to get the frames the game.
For this, let's import cv2 and grab_screen:
from grabscreen import grab_screen
import cv2
Next, rather than for image_path in TEST_IMAGE_PATHS:, we will use while True: and then rather that grabbing images and converting to numpy arrays, we can just use our grab_screen function which already returns a numpy array image. So, instead of:
      image = Image.open(image_path)
      # the array based representation of the image will be used later in order to prepare the
      # result image with boxes and labels on it.
      image_np = load_image_into_numpy_array(image)
we can do:
      screen = cv2.resize(grab_screen(region=(0,40,1280,745)), (800,450))
      image_np = cv2.cvtColor(screen, cv2.COLOR_BGR2RGB)
Finally, after the vis_util line, annotating our frames with detected objects, we can visualize it with:
      cv2.imshow('window',image_np)
      if cv2.waitKey(25) & 0xFF == ord('q'):
          cv2.destroyAllWindows()
          break
Full code is:
# coding: utf-8
# # Object Detection Demo
# License: Apache License 2.0 (https://github.com/tensorflow/models/blob/master/LICENSE)
# source: https://github.com/tensorflow/models
import numpy as np
import os
import six.moves.urllib as urllib
import sys
import tarfile
import tensorflow as tf
import zipfile

from collections import defaultdict
from io import StringIO
from matplotlib import pyplot as plt
from PIL import Image
from grabscreen import grab_screen
import cv2

# This is needed since the notebook is stored in the object_detection folder.
sys.path.append("..")


# ## Object detection imports
# Here are the imports from the object detection module.

from utils import label_map_util
from utils import visualization_utils as vis_util


# # Model preparation
# What model to download.
MODEL_NAME = 'ssd_mobilenet_v1_coco_11_06_2017'
MODEL_FILE = MODEL_NAME + '.tar.gz'
DOWNLOAD_BASE = 'http://download.tensorflow.org/models/object_detection/'

# Path to frozen detection graph. This is the actual model that is used for the object detection.
PATH_TO_CKPT = MODEL_NAME + '/frozen_inference_graph.pb'

# List of the strings that is used to add correct label for each box.
PATH_TO_LABELS = os.path.join('data', 'mscoco_label_map.pbtxt')

NUM_CLASSES = 90

# ## Download Model
opener = urllib.request.URLopener()
opener.retrieve(DOWNLOAD_BASE + MODEL_FILE, MODEL_FILE)
tar_file = tarfile.open(MODEL_FILE)
for file in tar_file.getmembers():
  file_name = os.path.basename(file.name)
  if 'frozen_inference_graph.pb' in file_name:
    tar_file.extract(file, os.getcwd())


# ## Load a (frozen) Tensorflow model into memory.
detection_graph = tf.Graph()
with detection_graph.as_default():
  od_graph_def = tf.GraphDef()
  with tf.gfile.GFile(PATH_TO_CKPT, 'rb') as fid:
    serialized_graph = fid.read()
    od_graph_def.ParseFromString(serialized_graph)
    tf.import_graph_def(od_graph_def, name='')


# ## Loading label map
# Label maps map indices to category names, so that when our convolution network predicts `5`, we know that this corresponds to `airplane`.  Here we use internal utility functions, but anything that returns a dictionary mapping integers to appropriate string labels would be fine
label_map = label_map_util.load_labelmap(PATH_TO_LABELS)
categories = label_map_util.convert_label_map_to_categories(label_map, max_num_classes=NUM_CLASSES, use_display_name=True)
category_index = label_map_util.create_category_index(categories)


# ## Helper code
def load_image_into_numpy_array(image):
  (im_width, im_height) = image.size
  return np.array(image.getdata()).reshape(
      (im_height, im_width, 3)).astype(np.uint8)

# Size, in inches, of the output images.
IMAGE_SIZE = (12, 8)

with detection_graph.as_default():
  with tf.Session(graph=detection_graph) as sess:
    while True:
      #screen = cv2.resize(grab_screen(region=(0,40,1280,745)), (WIDTH,HEIGHT))
      screen = cv2.resize(grab_screen(region=(0,40,1280,745)), (800,450))
      image_np = cv2.cvtColor(screen, cv2.COLOR_BGR2RGB)
      # Expand dimensions since the model expects images to have shape: [1, None, None, 3]
      image_np_expanded = np.expand_dims(image_np, axis=0)
      image_tensor = detection_graph.get_tensor_by_name('image_tensor:0')
      # Each box represents a part of the image where a particular object was detected.
      boxes = detection_graph.get_tensor_by_name('detection_boxes:0')
      # Each score represent how level of confidence for each of the objects.
      # Score is shown on the result image, together with the class label.
      scores = detection_graph.get_tensor_by_name('detection_scores:0')
      classes = detection_graph.get_tensor_by_name('detection_classes:0')
      num_detections = detection_graph.get_tensor_by_name('num_detections:0')
      # Actual detection.
      (boxes, scores, classes, num_detections) = sess.run(
          [boxes, scores, classes, num_detections],
          feed_dict={image_tensor: image_np_expanded})
      # Visualization of the results of a detection.
      vis_util.visualize_boxes_and_labels_on_image_array(
          image_np,
          np.squeeze(boxes),
          np.squeeze(classes).astype(np.int32),
          np.squeeze(scores),
          category_index,
          use_normalized_coordinates=True,
          line_thickness=8)

      cv2.imshow('window',image_np)
      if cv2.waitKey(25) & 0xFF == ord('q'):
          cv2.destroyAllWindows()
          break
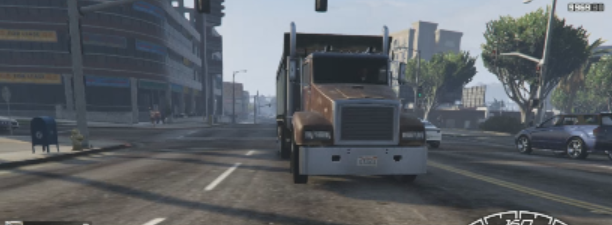
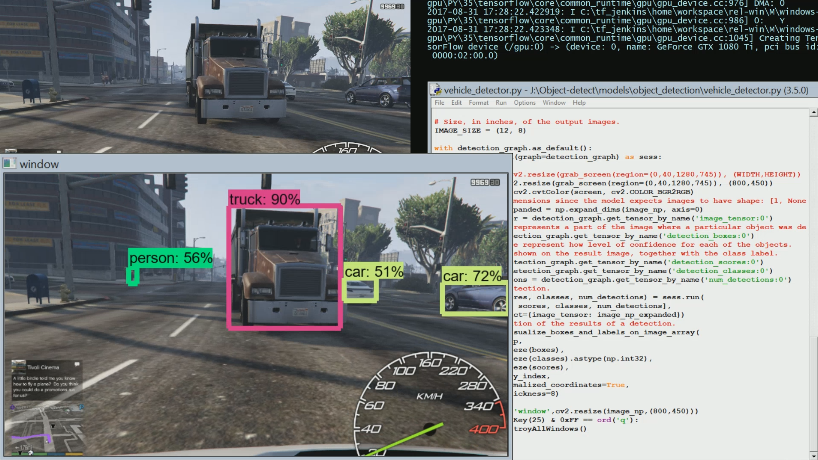
The result, with GTA running, gives us a live stream of objects being detected. For example, from the following image:

We can detect:

Which is pretty darn impressive, especially the detected person in the distance. Typically, detection at that much distance isn't as good as this, at this resolution. Other objects we can successfully detect in GTA: traffic lights, stop signs, dogs, fire hydrants, benches, and more.
In the next tutorial, we're going to attempt to detect when a vehicle is too close, working off this code.
-
Reading game frames in Python with OpenCV - Python Plays GTA V
-
OpenCV basics - Python Plays GTA V
-
Direct Input to Game - Python Plays GTA V
-
Region of Interest for finding lanes - Python Plays GTA V
-
Hough Lines - Python Plays GTA V
-
Finding Lanes for our self driving car - Python Plays GTA V
-
Self Driving Car - Python Plays GTA V
-
Next steps for Deep Learning self driving car - Python Plays GTA V
-
Training data for self driving car neural network- Python Plays GTA V
-
Balancing neural network training data- Python Plays GTA V
-
Training Self-Driving Car neural network- Python Plays GTA V
-
Testing self-driving car neural network- Python Plays GTA V
-
A more interesting self-driving AI - Python Plays GTA V
-
Object detection with Tensorflow - Self Driving Cars in GTA
-
Determining other vehicle distances and collision warning - Self Driving Cars in GTA
-
Getting the Agent a Vehicle- Python Plays GTA V
-
Acquiring a Vehicle for the Agent - Python Plays GTA V
